
Introduction
This post is intended as a short introduction to the features of the QMole Linux desktop.
Background
A typical Linux or Microsoft Windows system features a “window manager.” Window managers allow applications to appear in window frames and allow these frames to be managed by the user: maximized, minimized, resized, shuffled and moved. These are tasks a typical Windows user performs every day – using a pointing device or “mouse.” A smart phone or tablet does not have a mouse. Also, because of the small screen, a typical smart phone will display only one application at a time. Menus and buttons and other user interface elements on a smart phone also tend to be larger. This is because finger tips are larger than mouse pointers, readily obscuring the view on user interface elements otherwise readily visible behind a mouse pointer. Because of these and other differences, we have come to take for granted that applications targeting smart phones and tablets need to be re-written using specialist user interface toolkits – such as UIKit on the iPhone and iPad.
What is special about QMole is that it allows regular Linux applications to be efficiently used on a smart phone or tablet device. In practice this means Linux applications run on the iPhone or iPad. This is where QMole draws the name QMole Linux. It is a reference to the Linux desktop – not the kernel. The kernel remains Darwin. A typical Linux system is Kernel + GNU + X11 Desktop & Window Manager. QMole is Darwin + GNU + X11 Desktop & Window Manager.
QMole operates a tiling window manager and a rules based smart routing window system that actively manages application windows to address the shortcomings of a smart phone touch screen. The user experience is similar to remotely accessing a Windows or Linux desktop from an iPhone or iPad. But with QMole, everything is local. QMole integrates with and manages the desktop and themes user interface elements ( such as GTK ) to suit the smart phone experience – all without changing the application software itself.
Why do this? Because there are many, many Linux applications that would otherwise be unavailable on the iPhone and iPad.
Virtual Desktops
The QMole desktop is arranged around the notion of virtual desktops that the user can switch between.
Desk – This is the default “home” desktop.
Term – This is the desktop to which terminal windows are routed.
Web – This is the desktop to which web browser windows are routed.
Pdf – This is the desktop to which PDF viewer / editor windows are routed.
Mail – This is the desktop to which email client windows are routed.
Edit – This is the desktop to which editor windows are routed.
File – This is the desktop to which file manager windows are routed.
Controls, Ribbons & Toolbars

QMole Linux Desktop
1 Active Virtual Desktop and Mouse Pointer
The active virtual desktop is marked with square brackets and shown in white. Here the [Desk] virtual desktop has been selected as the active desktop by “clicking” it with the “mouse”. More about the mouse that “we don’t have” later.
2 Virtual Desktop with running application(s)
Virtual desktops that have running applications are shown in white.
3 Virtual Desktop without running application(s)
A virtual desktop that has no running applications and is not presently the active desktop, is shown in grey.
4 Function Keys
To the right of the separator | are function keys [U] for Up, [D] for Down.
5 Scroll Ribbon
The scroll ribbon is a transparent stripe along the right window edge. Swipe here to scroll the content of a window – any window – up and down. This area is designed to align with GTK scroll bars in QMole applications which are “themed” to place their scroll bars on the right and enlarged to allow finger based touch screen operation.
6 Reset Button
The chief use for this button is to restore the QMole interface to its original state following zoom operations. Linux user interface elements don’t independently zoom the way that specialist touch screen user interface toolkits do. But the desktop can be both zoomed and panned. To quickly snap the desktop back to fit the screen, press the Reset Button.
7 Mouse Mode Button
We said earlier that the smart phone does not have a mouse. Yet neither do modern notebook computers. Mouse mode treats your phone’s display like a notebook touchpad. This is the default mode of operation. Swipe anywhere on the screen to move the mouse pointer; tap to click; two-finger-tap to right-click — just like your notebook. This has the advantage of getting that “precision feeling” back that you are accustomed to from your desktop computer. This is the default mode of operation when QMole starts.
8 Point-To-Click Mode Button
Not all applications are best served with mouse mode. What of a calculator app with large buttons? Nobody wants to drag a mouse pointer around, then tap to click. Why not just touch the buttons on the screen? Clearly, here the touch screen paradigm is a better fit. You chose which mode you are more comfortable with. In this mode the Linux mouse pointer follows where ever you tap the screen. See the calculator example further down on this page.
9 Toggle Keyboard Button
This button toggles keyboard visibility. This button puts you in control over text entry fields. You don’t need to have the keyboard displayed if you are reading just because it is a text field. And because QMole integrates with the desktop, displaying the keyboard will re-size any windows which are presently played. No window is obscured when the keyboard is shown. This is the essence of a tiling window manager.
10 Toggle Scroll-Mode Button
Sometimes the only appropriate swipe action is scrolling: think terminal windows. If you are a Unix administrator, you will appreciate this. Press this button to enable scroll mode. Press it again to turn scroll mode off.
11 Toggle the QMole Toolbar
Press this button to hide the QMole toolbar. This will reveal the application launcher toolbar. On the iPhone the two toolbars are superimposed to save space. On the iPad they are shown simultaneously one above the other. See below for information on the application launcher toolbar.
Application Launcher Toolbar
The application launcher toolbar is a traditional Linux application launcher bar positioned at the bottom of the screen.

QMole Application Launcher Toolbar
1 Terminal Launcher
The terminal launcher starts a Linux console. You can start multiple console windows. These will be tiled on the Term virtual desktop.
2 Emacs Launcher
The Emacs launcher starts an Emacs editor session. Emacs is not a core package but you can download it from the QMole repository. This is a full Emacs 24 GTK build supporting the latest Melpa package management system.
3 File Manager Launcher
The File Manager launcher starts an file manager similar to iFile but integrated with the QMole desktop. This will be tiled on the File virtual desktop.
4 Calculator Launcher
The Calculator launcher starts a graphical calculator app.
5 E-Mail Launcher
The E-Mail launcher starts the Claws E-Mail client. a graphical calculator app. This will be tiled on the Mail virtual desktop.
6 Browser Launcher
The Browser launcher starts the Netsurf web browser. Netsurf is not a core package but you can download it from the QMole repository. This will be tiled on the Web virtual desktop.
7 Toggle the QMole Toolbar
Press this button to show the QMole toolbar again.
Calculator Example Point-To-Click Mode
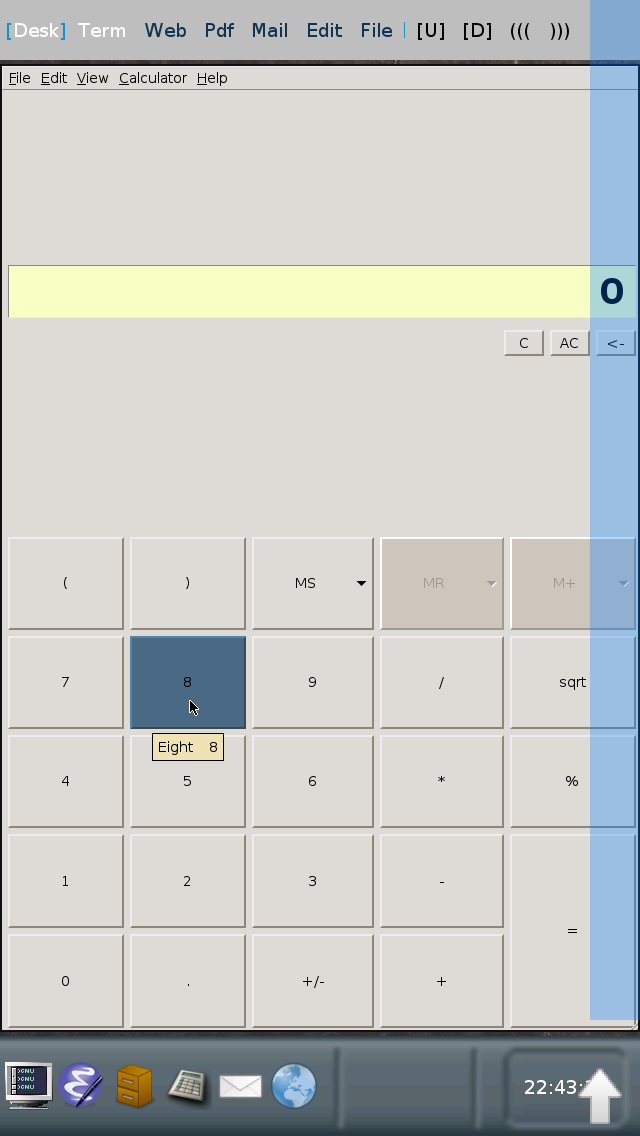
Calculator Example
Window Resizing when Keyboard Toggled Example

Text Terminal Without Keyboard

Auto-Resized Text Terminal With Keyboard
Netsurf Browser Example

Netsurf Browser
Emacs Example

Emacs 24
File Manager Example

File Manager
